Archive for the 'Creativity' Category


Make This: Cosplay Armor and Accessories

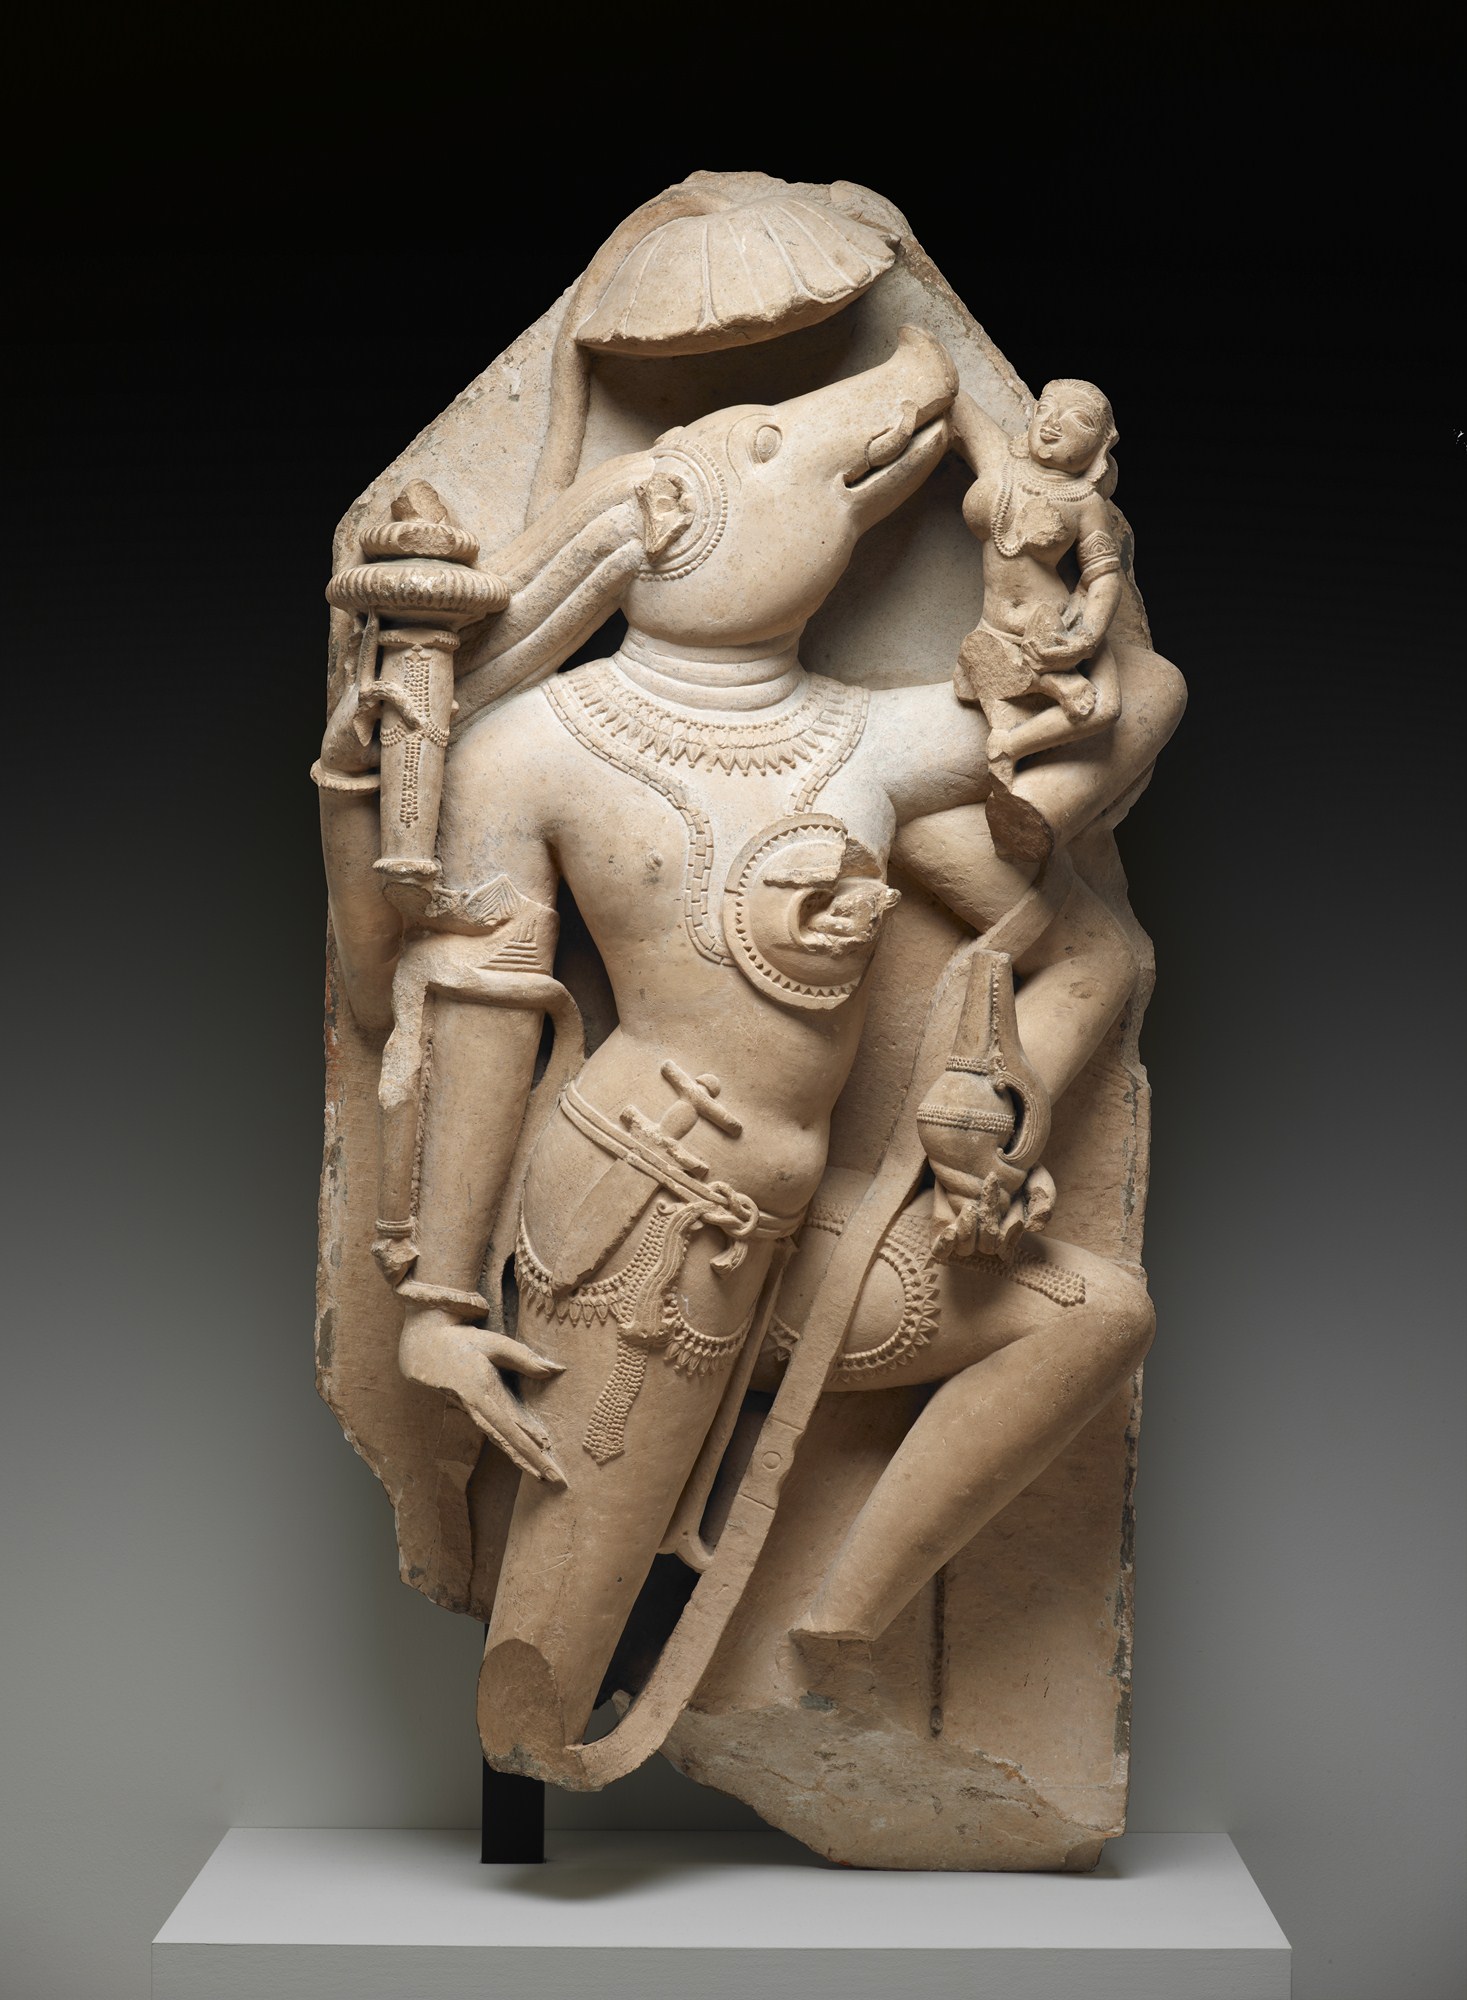
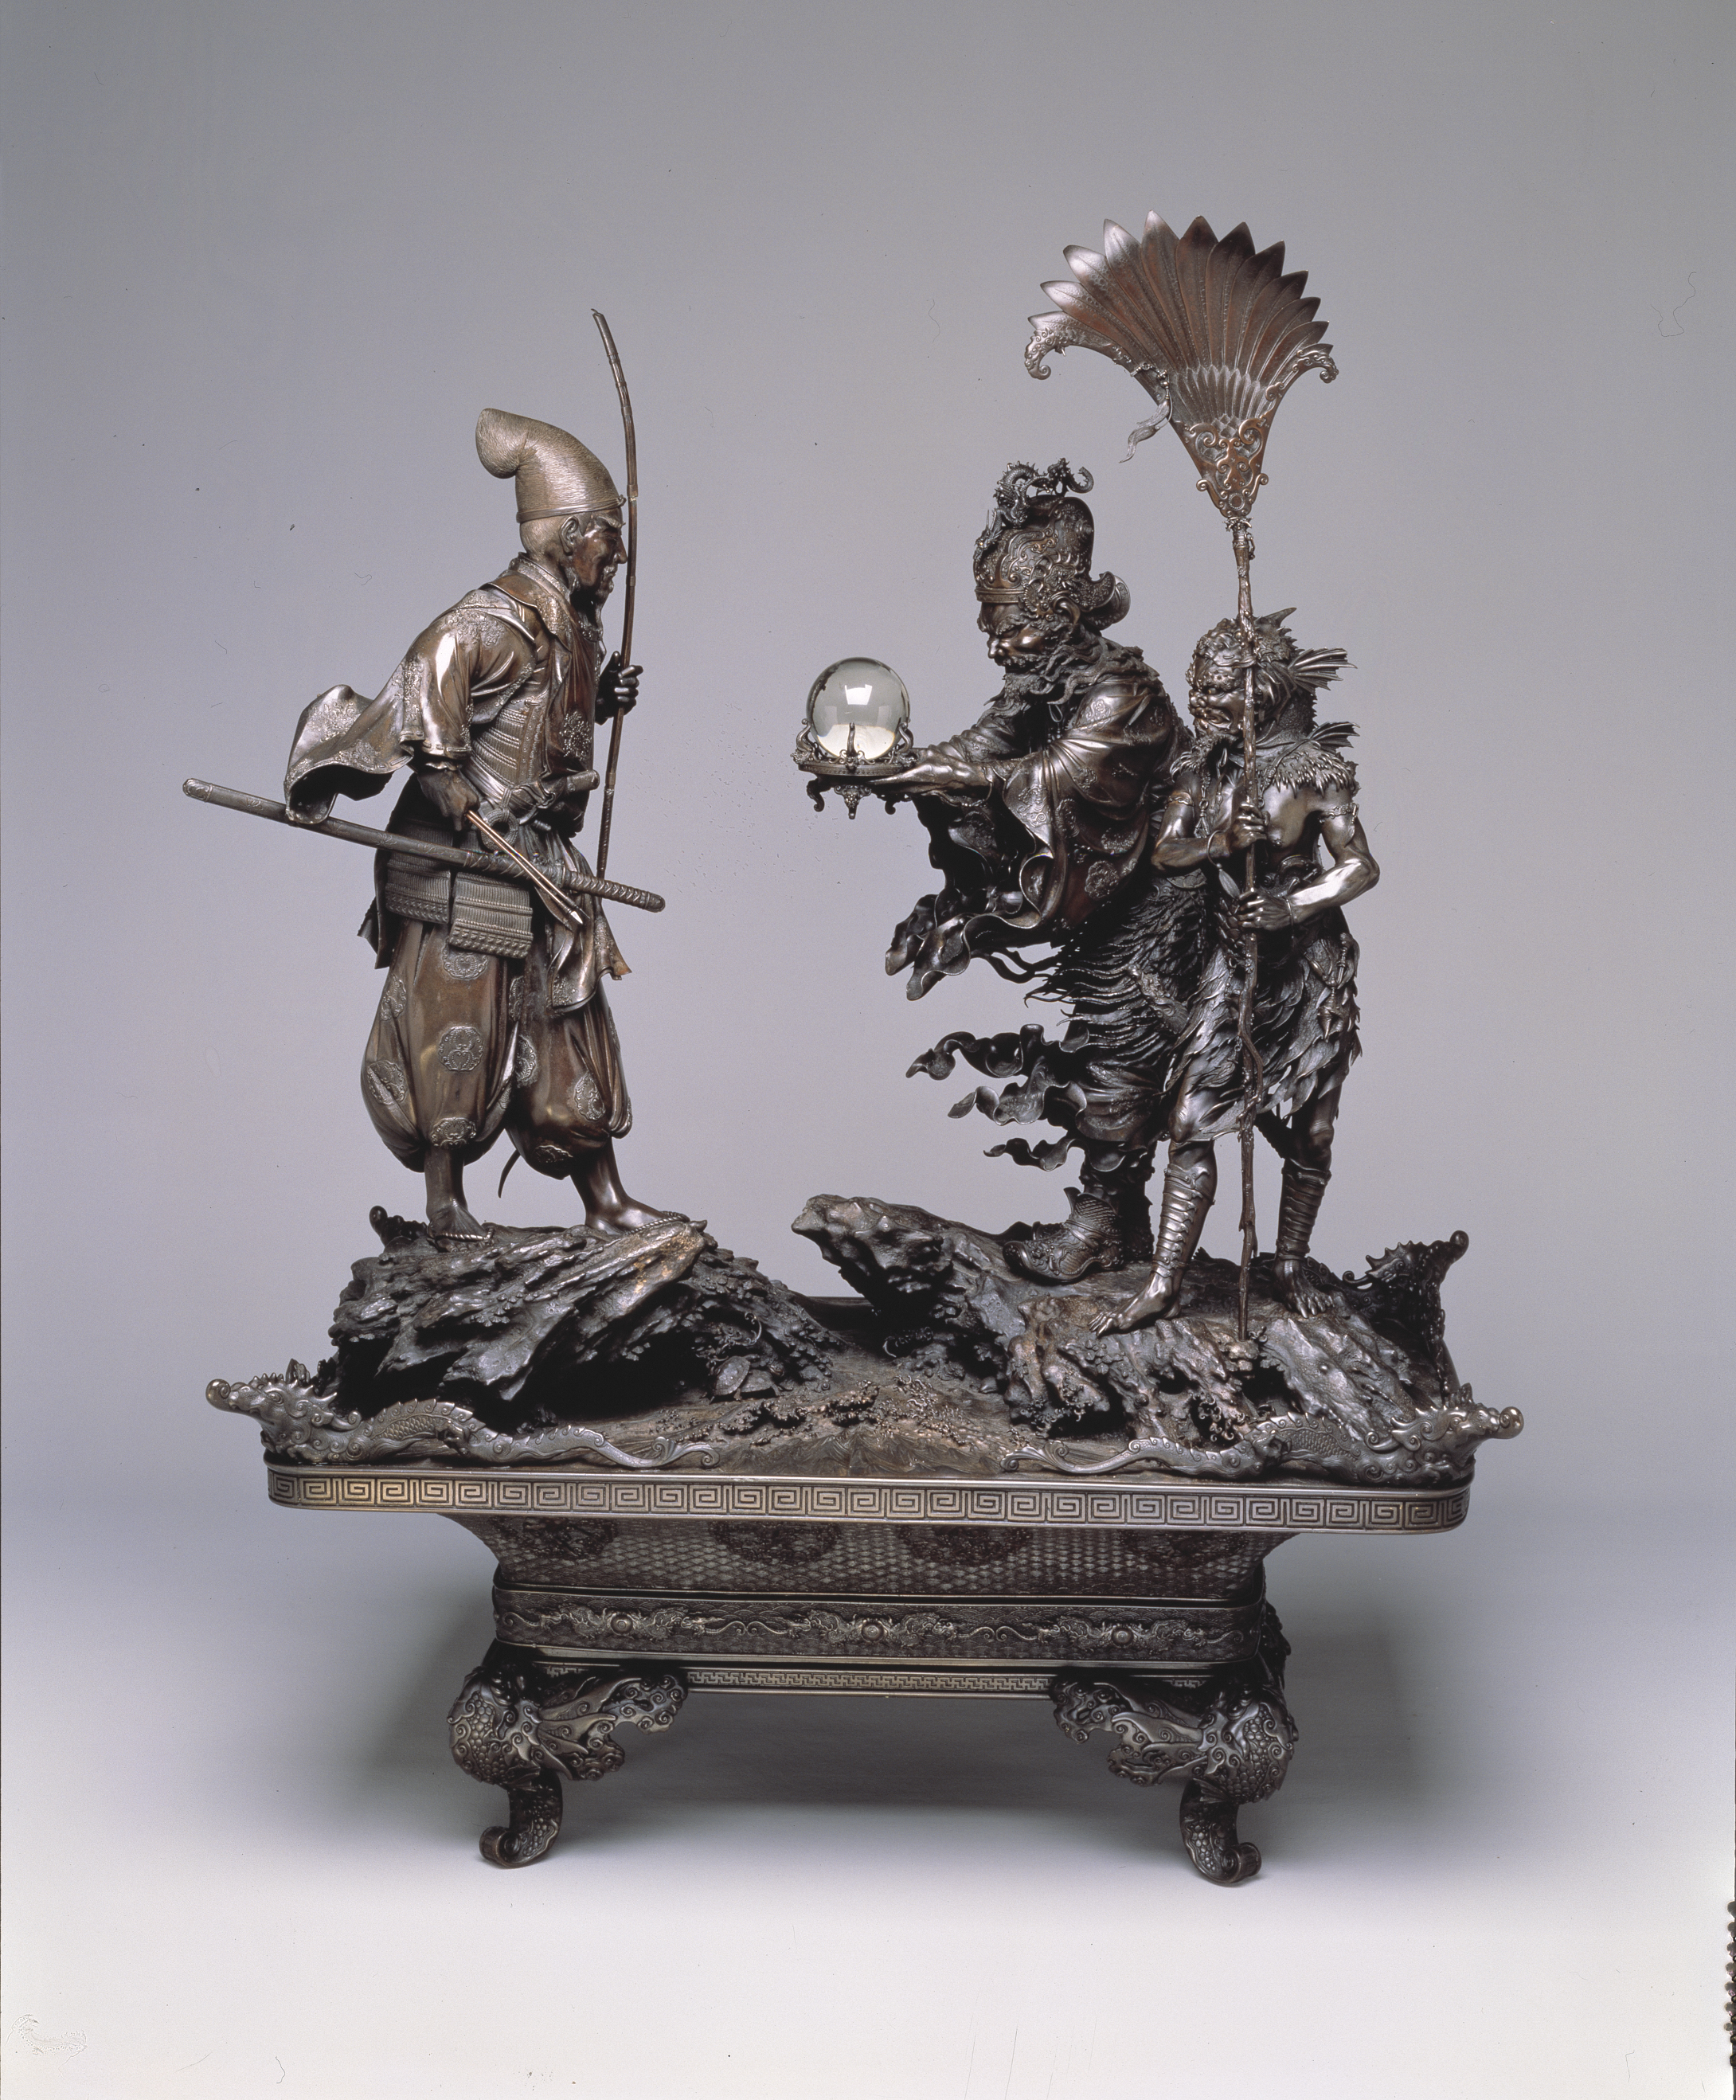
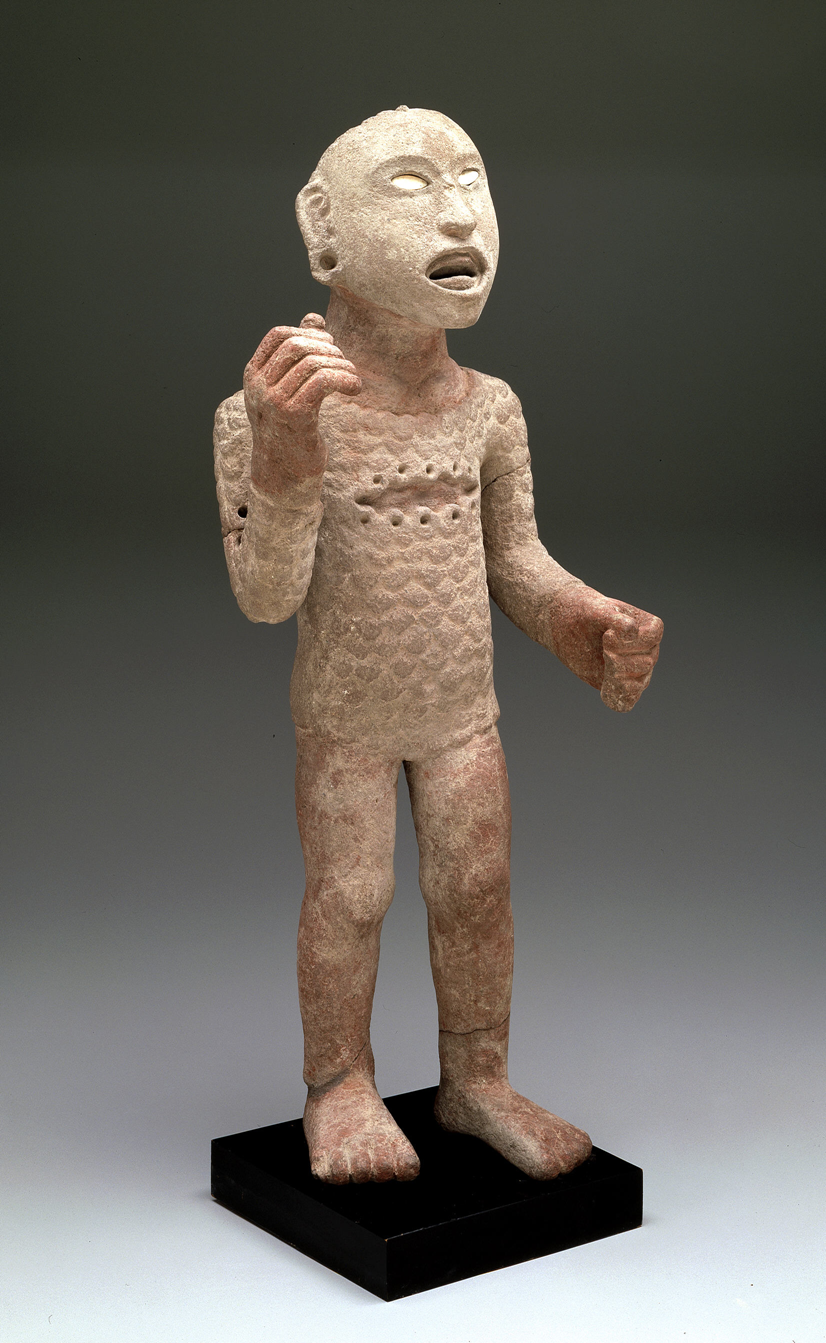
Takenouchi no Sukune Meets the Dragon King of the Sea, Japan, 1875-1879, Dallas Museum of Art, Foundation for the Arts Collection, The John R. Young Collection, gift of M. Frances and John R. Young

In thinking of an activity relating to the sculpture above for our June Studio Creations workshops, I kept coming back to the idea of costumes. The outfits, armor, and accessories worn by each of the three figures is amazingly detailed, and with Dallas Comic Con on the way, making cosplay accessories seemed like a really fun project. I’m going to show you how I made a “fin”-style gauntlet. But you can apply these directions to make whatever you want: helmet, tiara, jewelry, cape, etc.
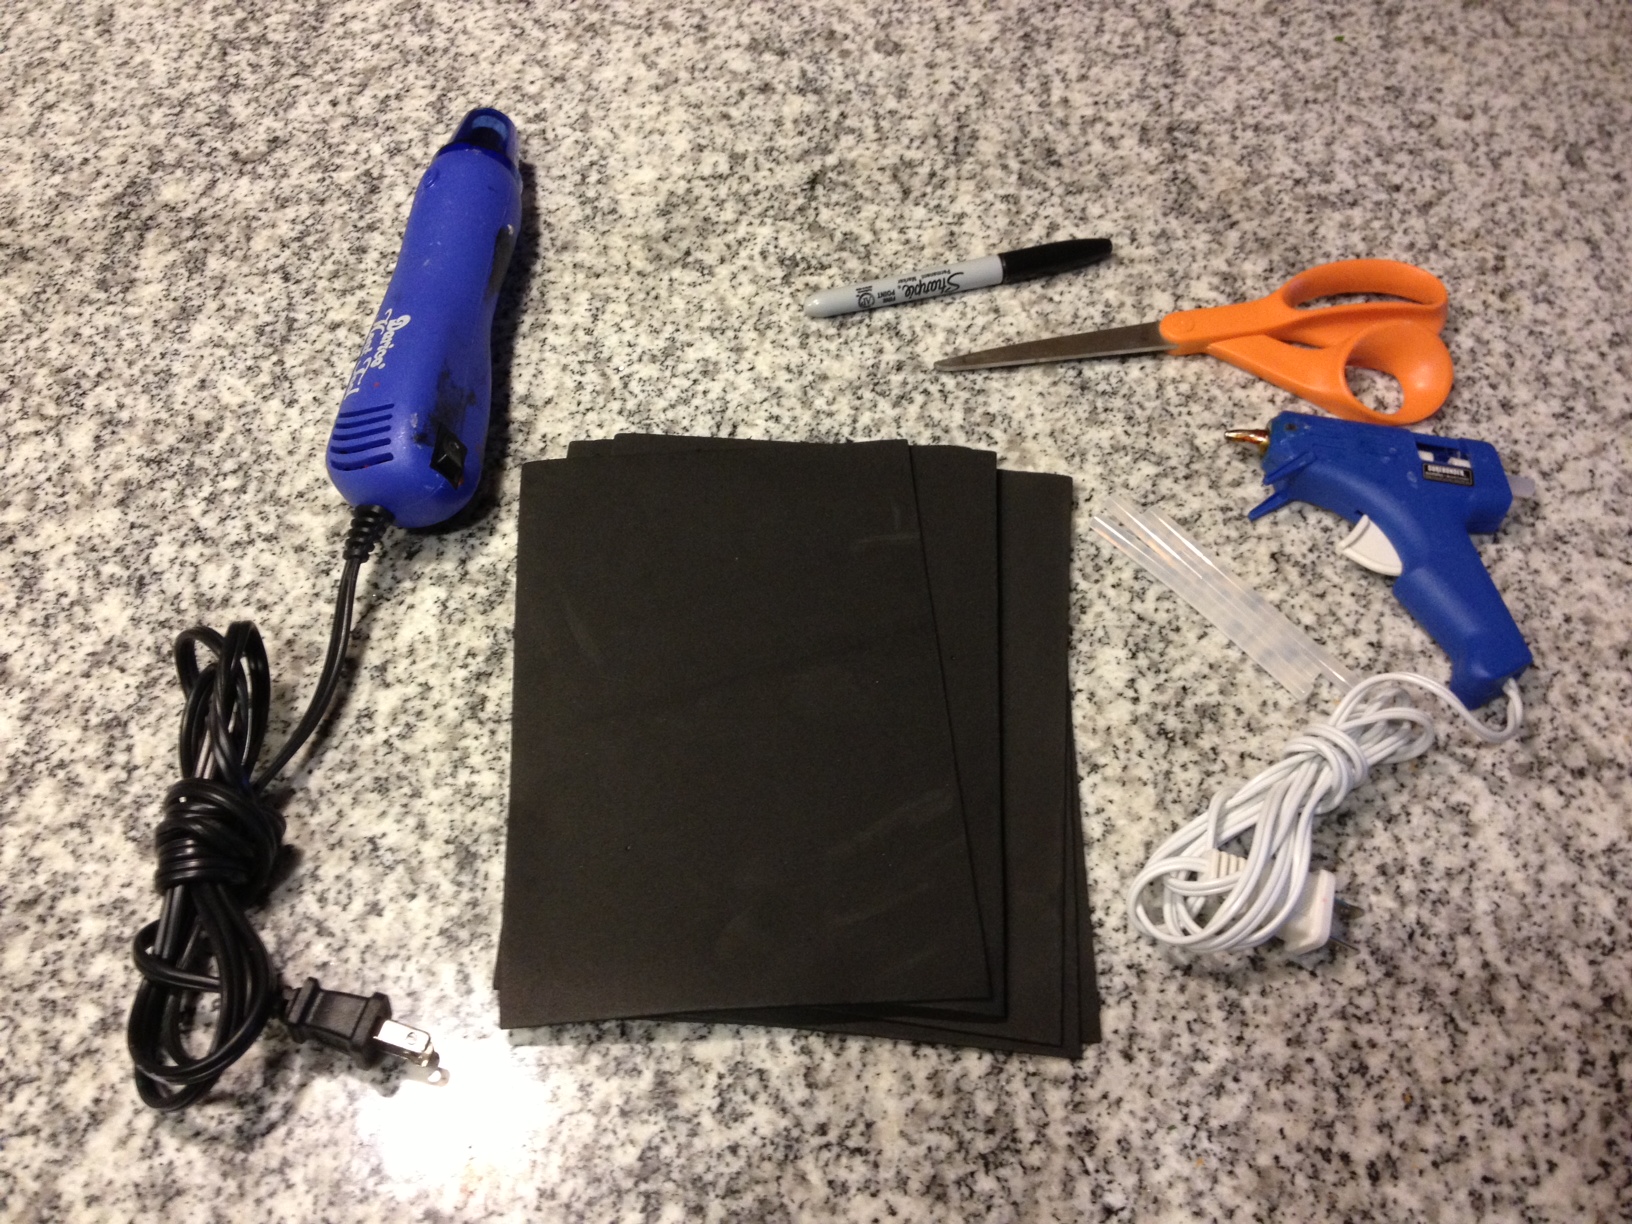
What you need:

  • Craft foam sheets (available at any craft store)
  • Self-adhesive foam stickers (optional)
  • Hot glue gun
  • Hair dryer or heat gun (optional)
  • Scissors
  • Sharpie marker
  • Scrap paper
  • Velcro (optional)
  • Elastic or rubber bands (optional)
  • Double-sided tape (optional)

photo 1

Steps

photo 2

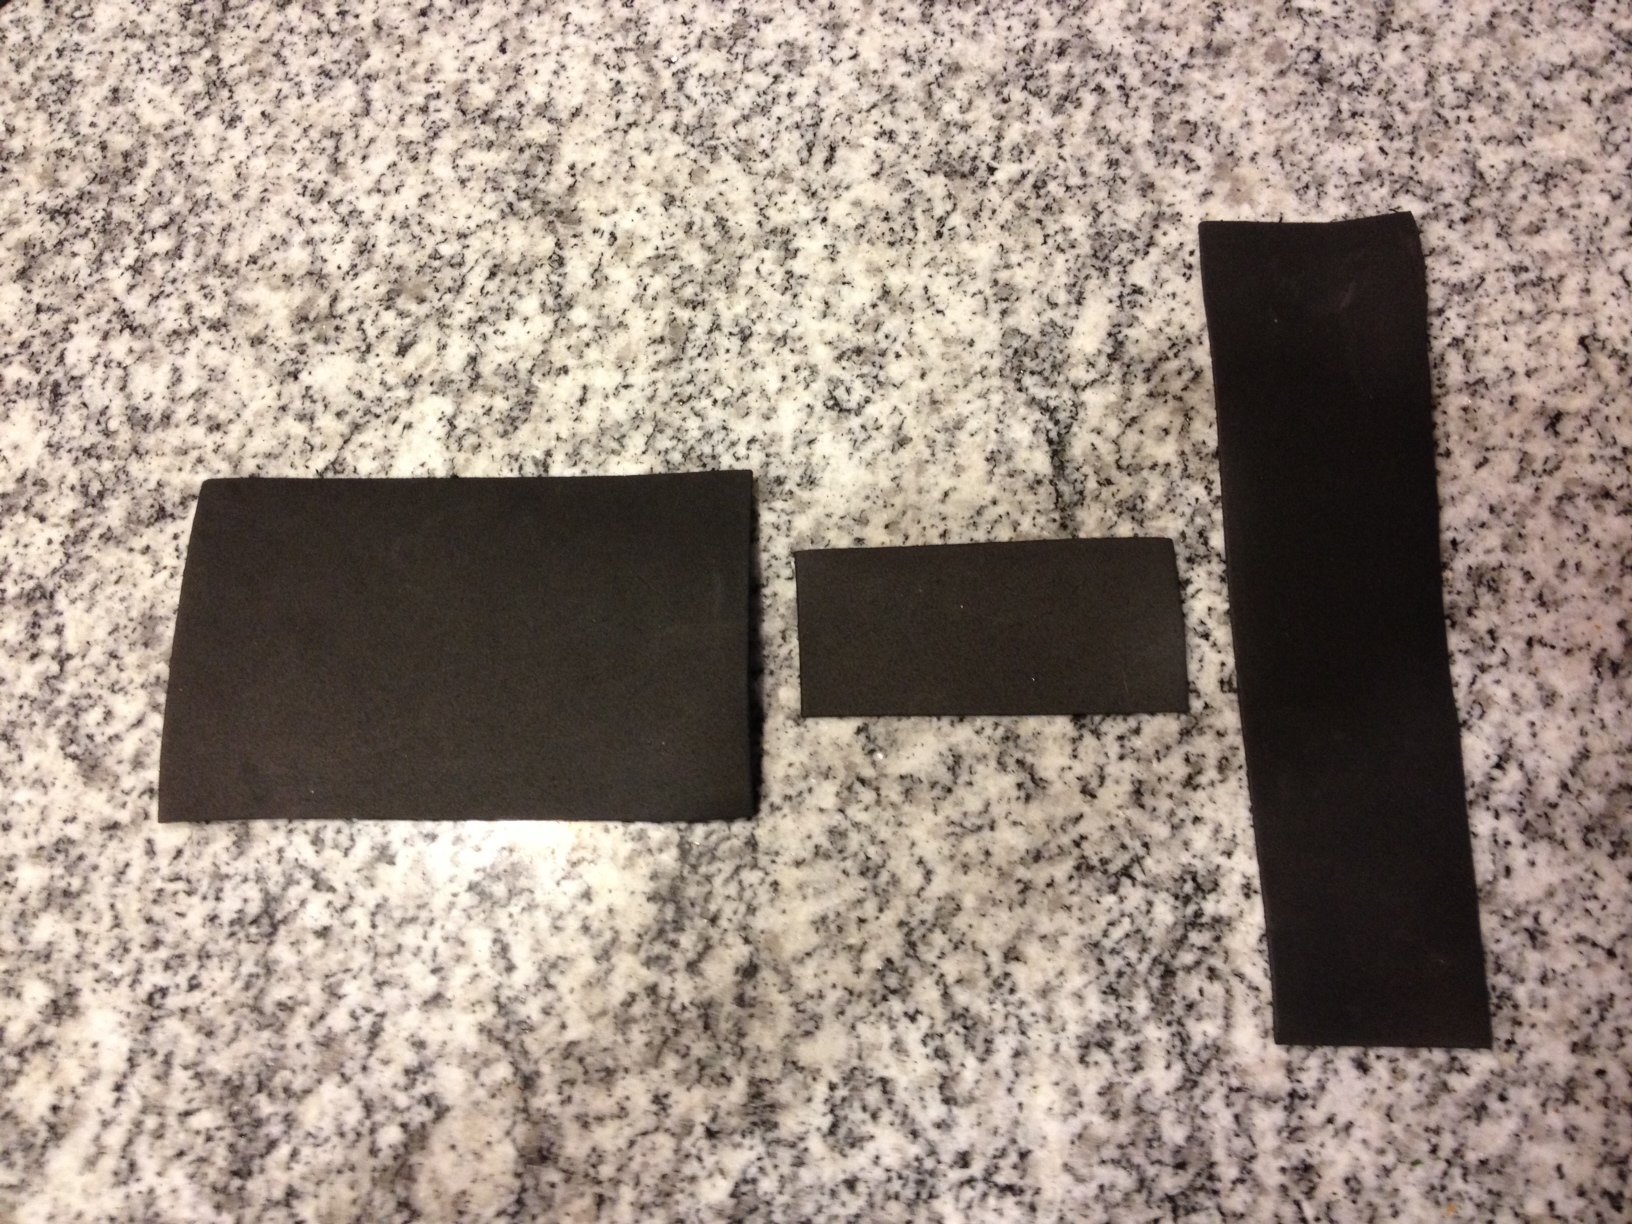
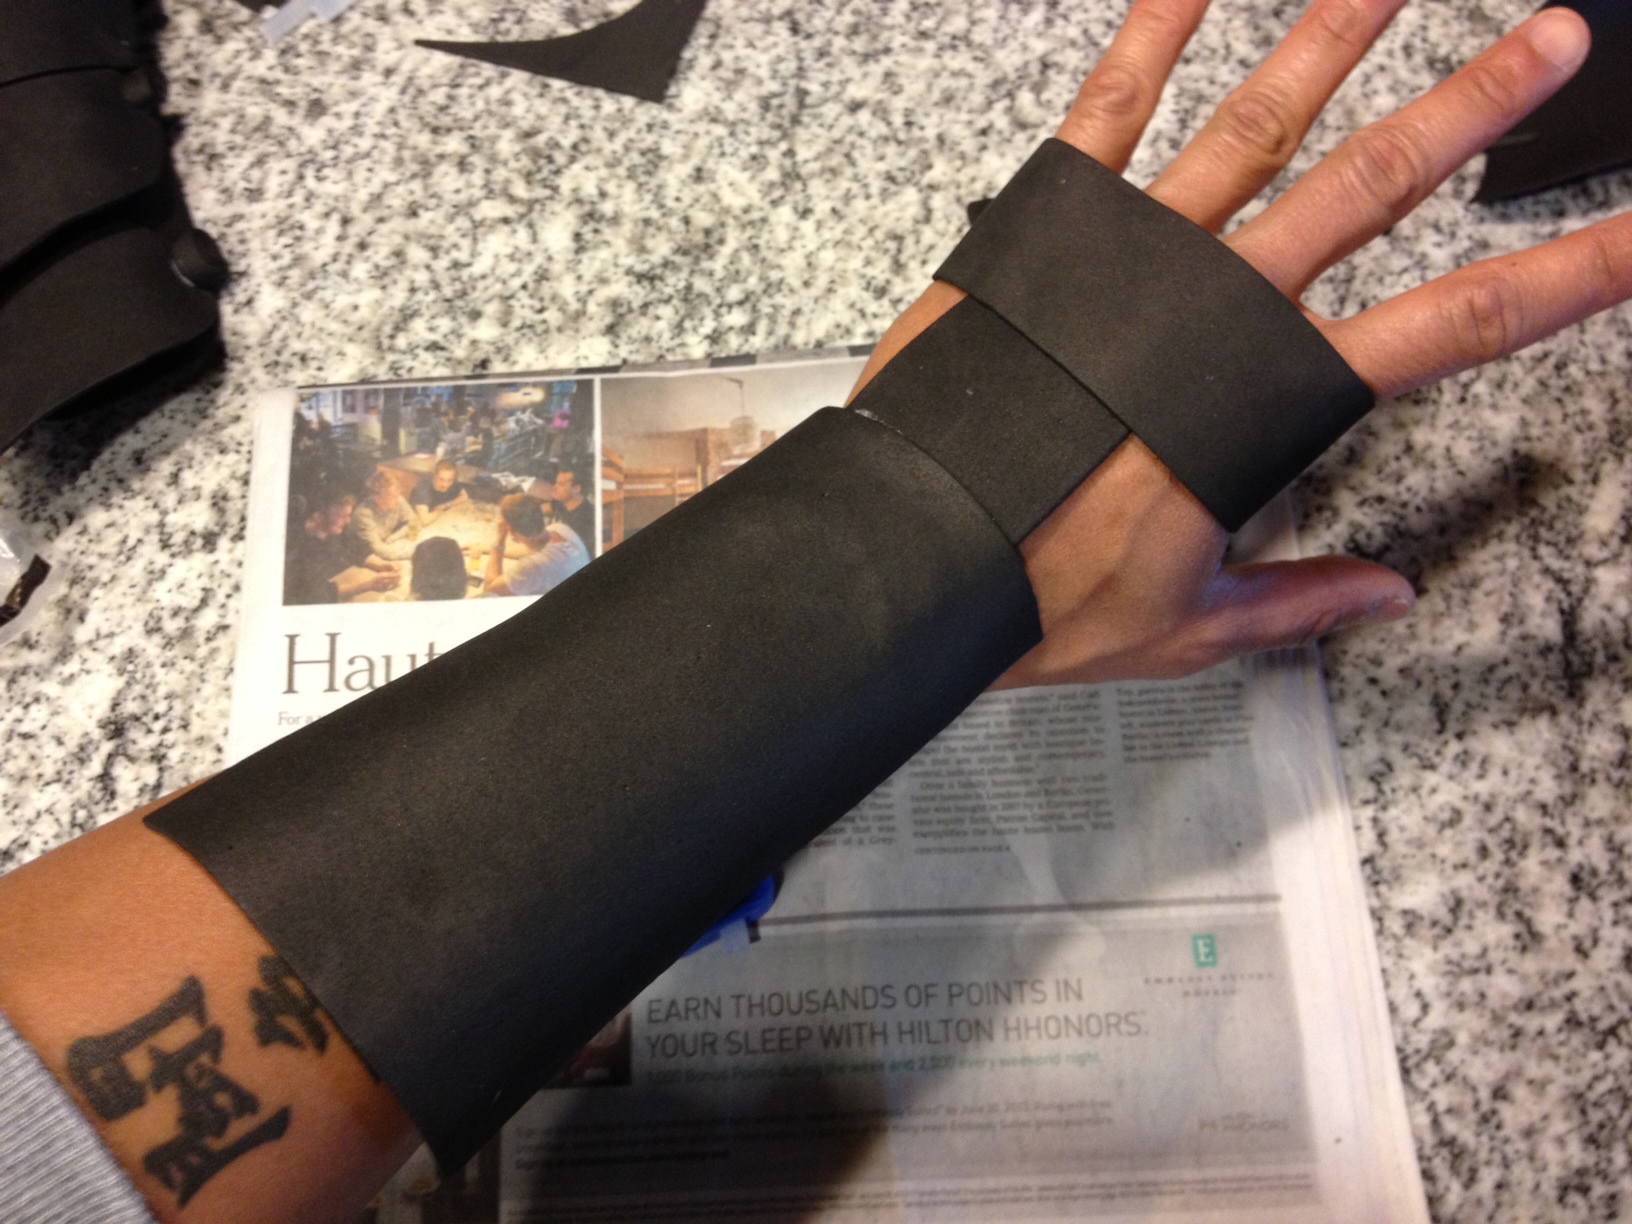
Pieces for the base of the gauntlet

For the base of the gauntlet, I cut a piece of craft foam to fit the back of my forearm. I made a similar piece to encircle the back of my hand and palm.
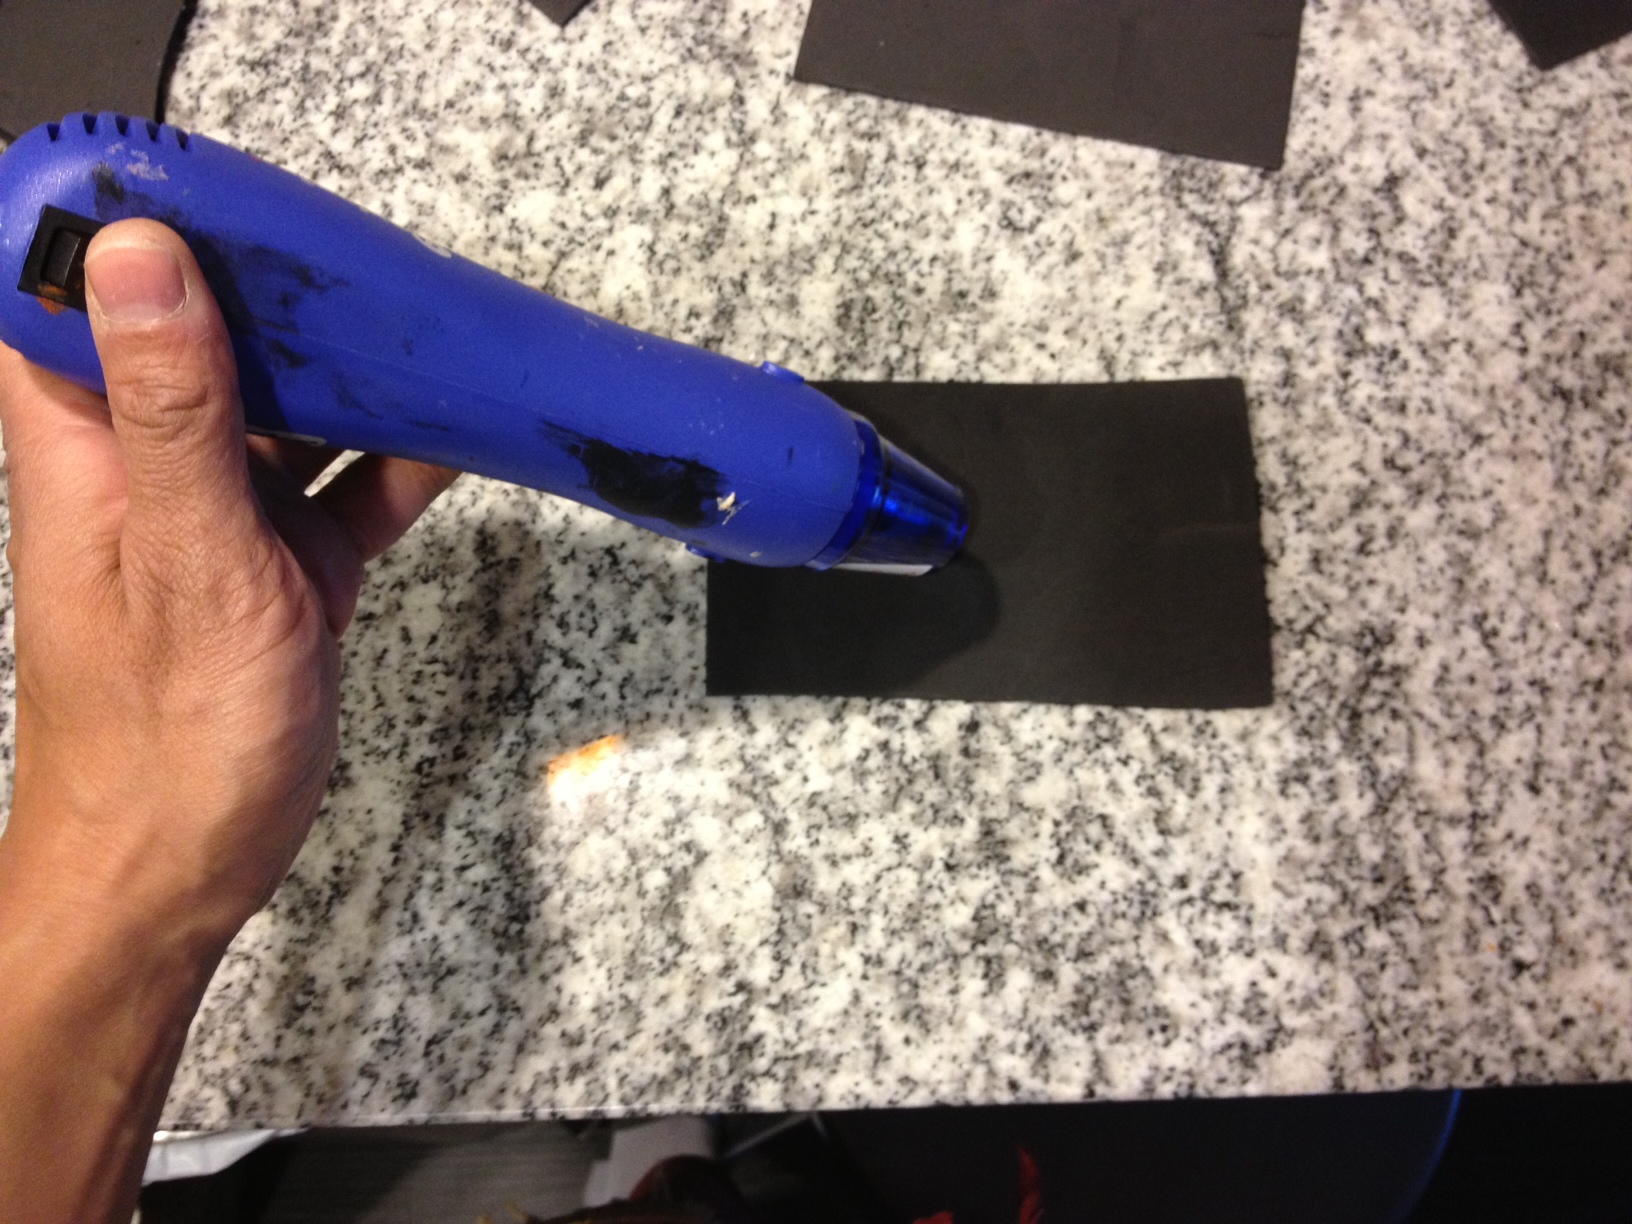
photo 3

Heating the foam

Optional: I used a heat gun to carefully heat and shape the foam. While it was still warm, I formed the pieces around my forearm and hand. You could also do this with a glass, tube, etc. If you want to skip this step, you can curl the foam without heating it–it just doesn’t hold its shape as well.
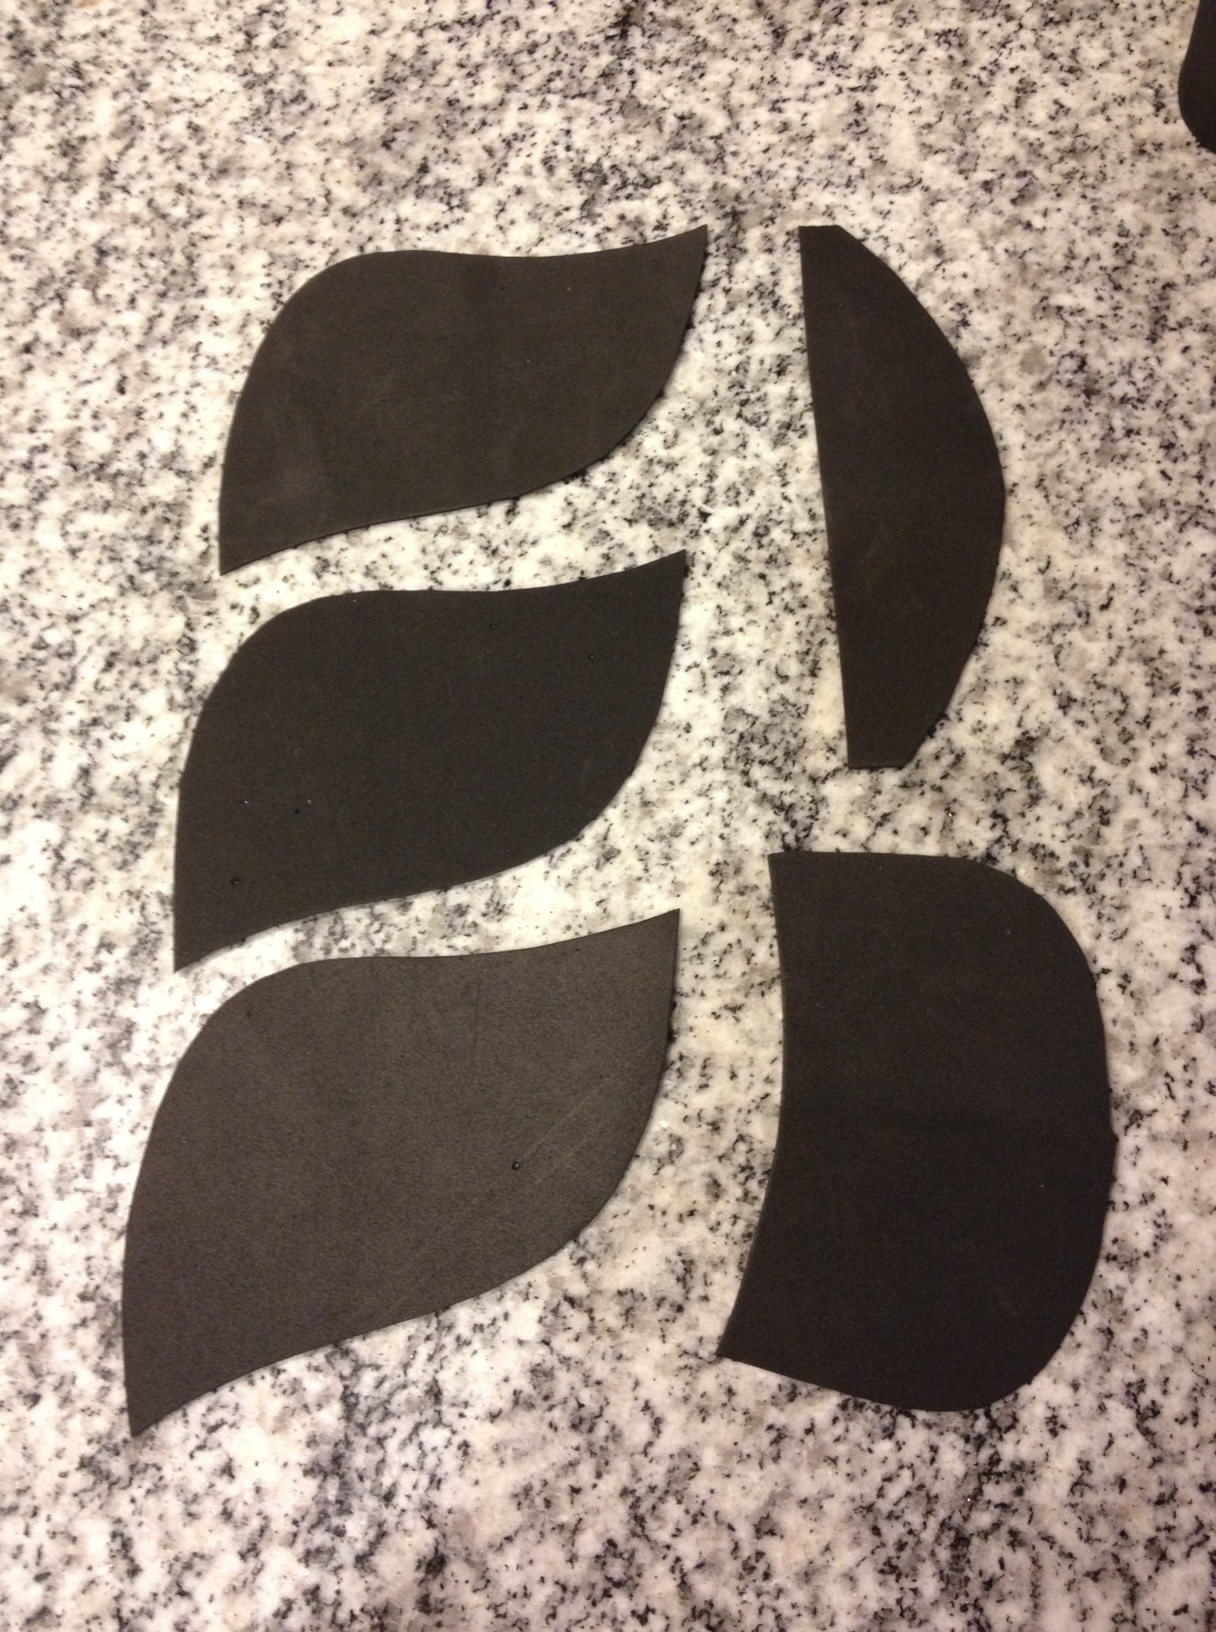
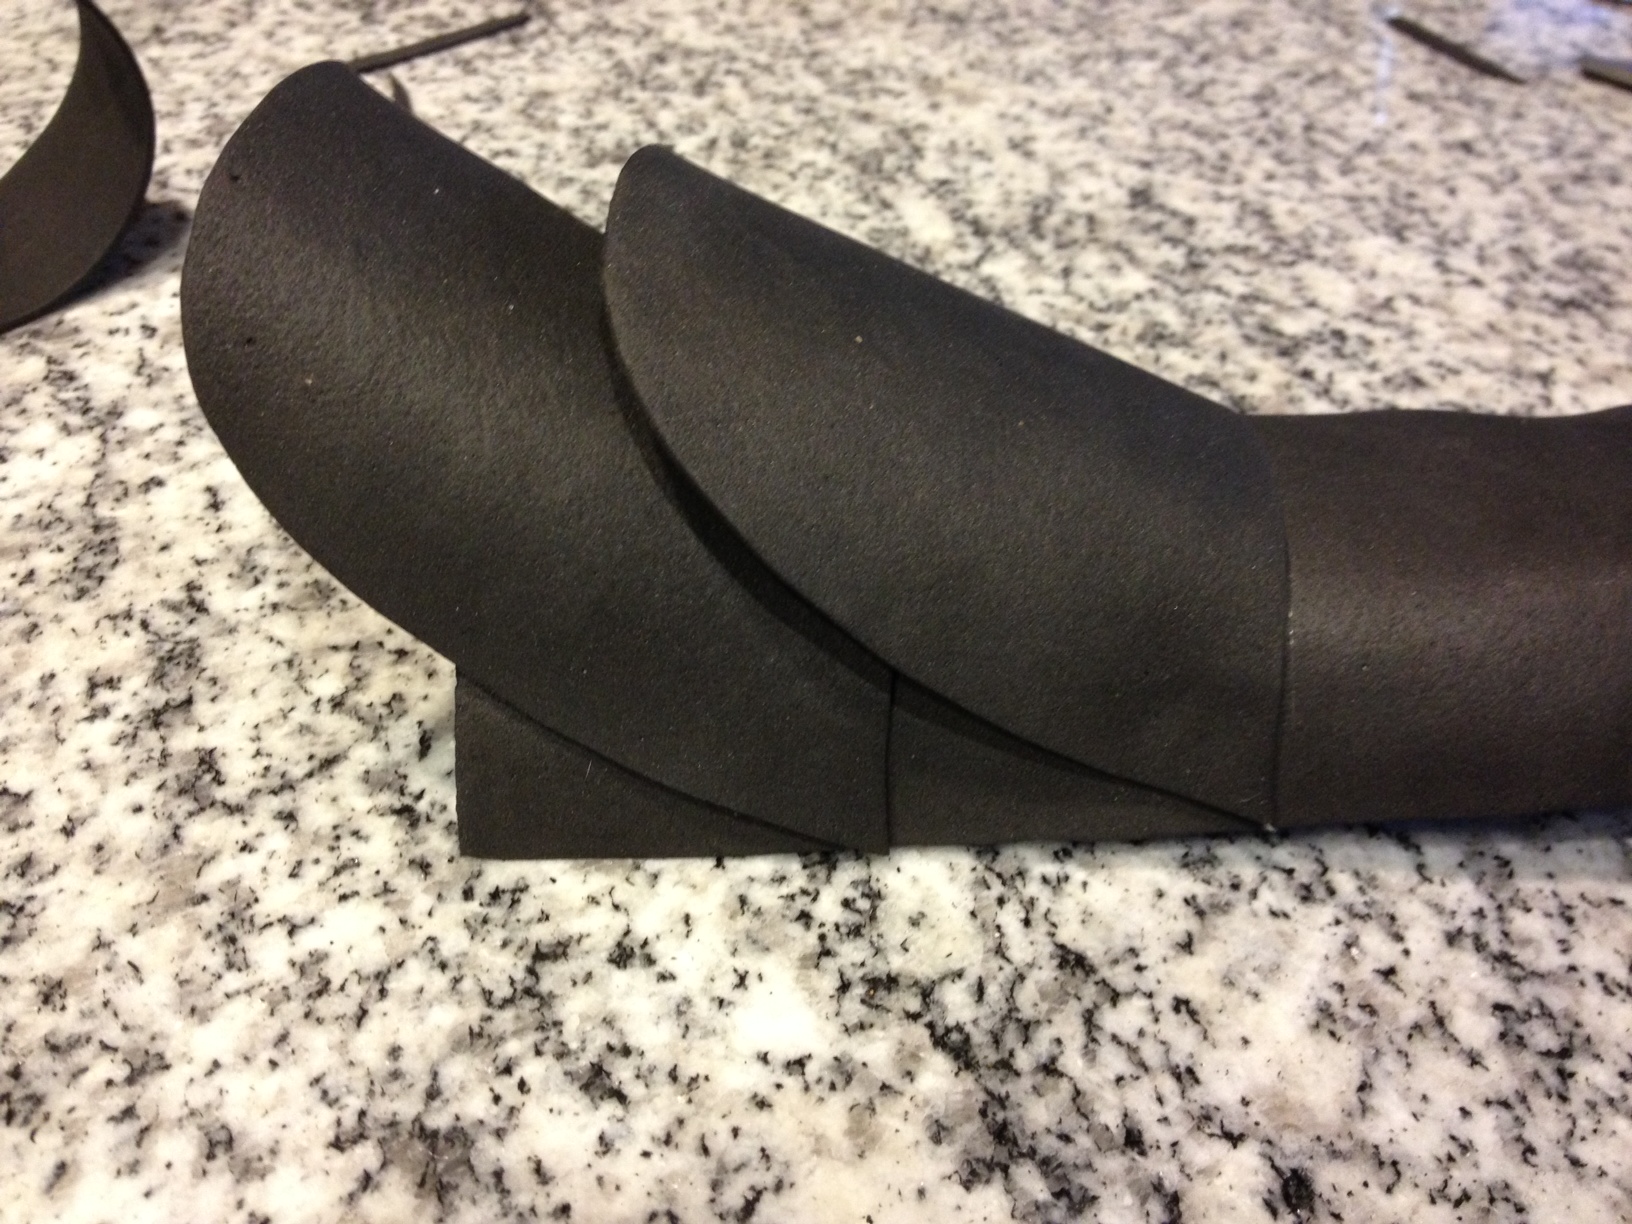
photo 5

“Armor” pieces

I then cut more foam pieces for the armor plating. You can draw the shape directly on the foam with your sharpie or you could cut out a template to use from your scrap paper.

Save the scraps of foam that are left over–these can be used for decorations later! Self-adhesive foam shapes work well for decoration, too.

photo 1

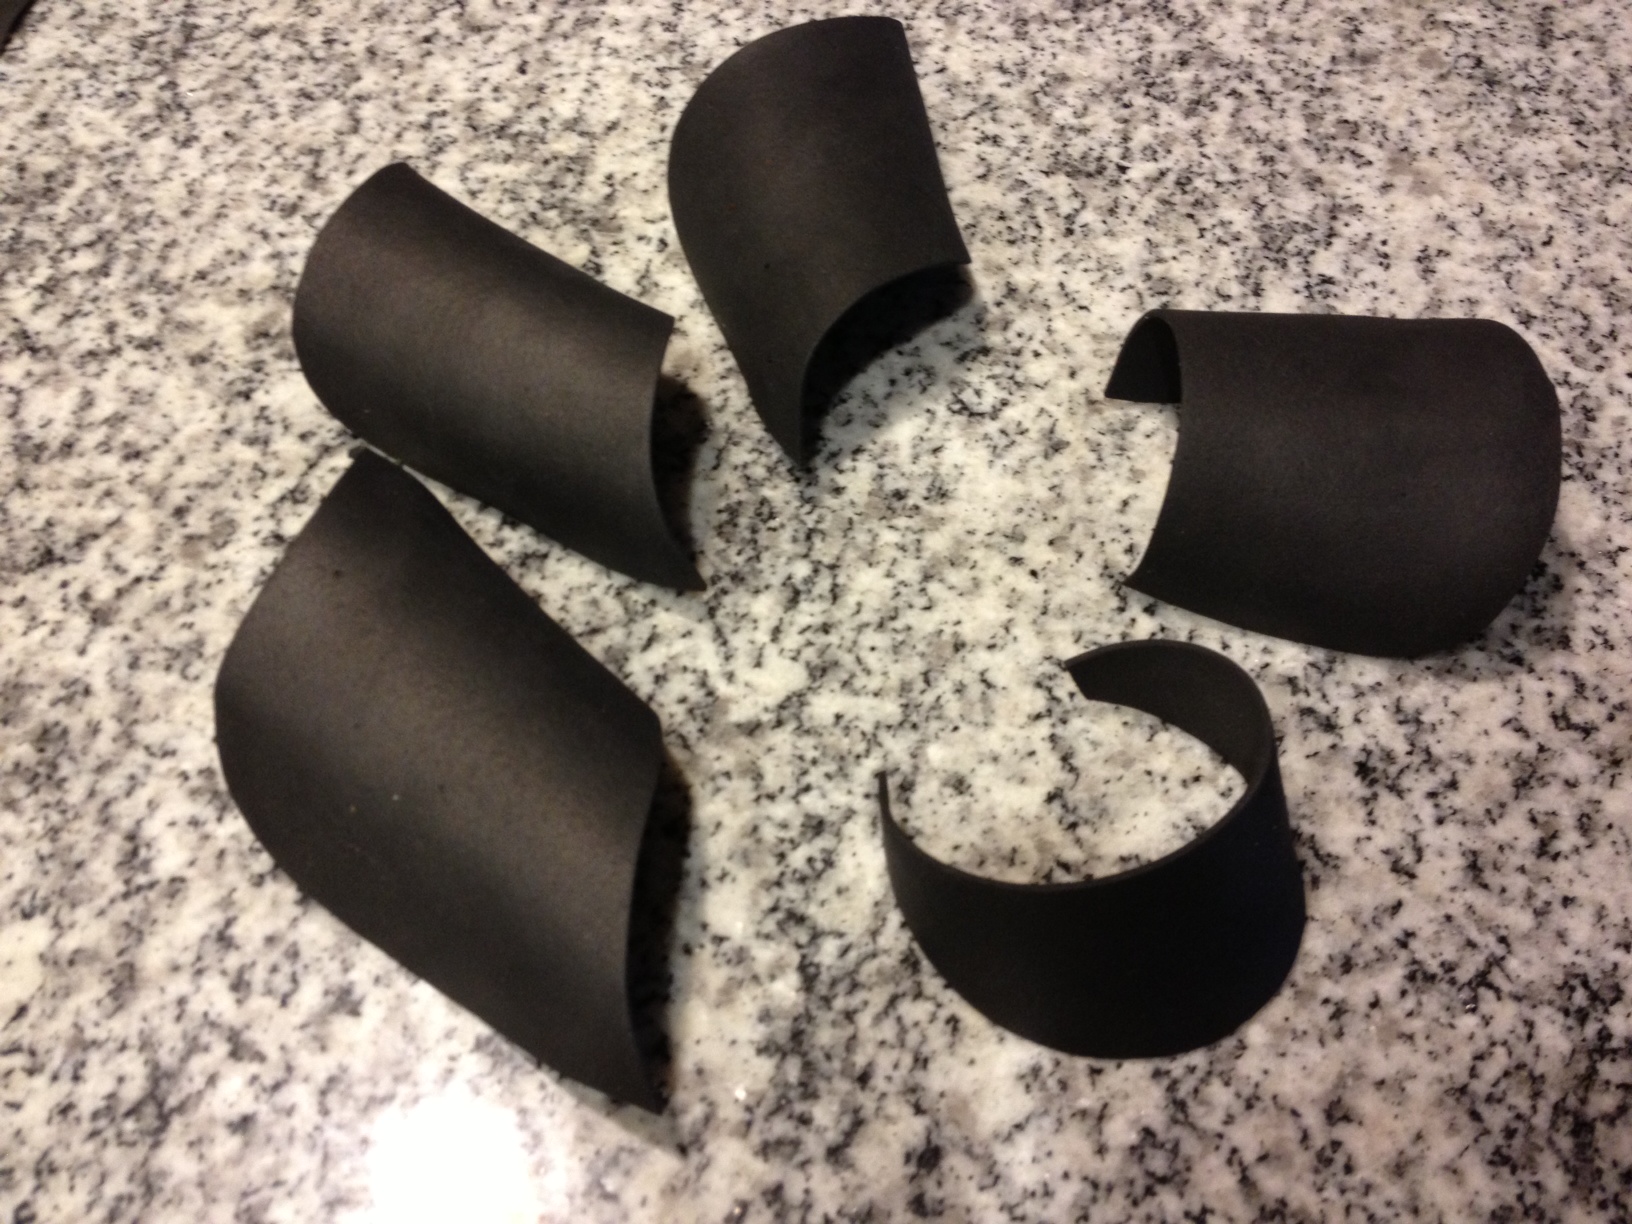
Pieces after being heated and shaped

photo 2

Gluing the base together

I then used a hot glue gun to put all of the pieces together. Double-sided tape works, too.

photo 3

Armor pieces glued at an angle to make them pop out

You could use velcro or elastic to make a closure for the glove so that it stays on your wrist. In this case, I used the scrap foam to make some small studs that I will stretch rubber bands across to hold it in place.
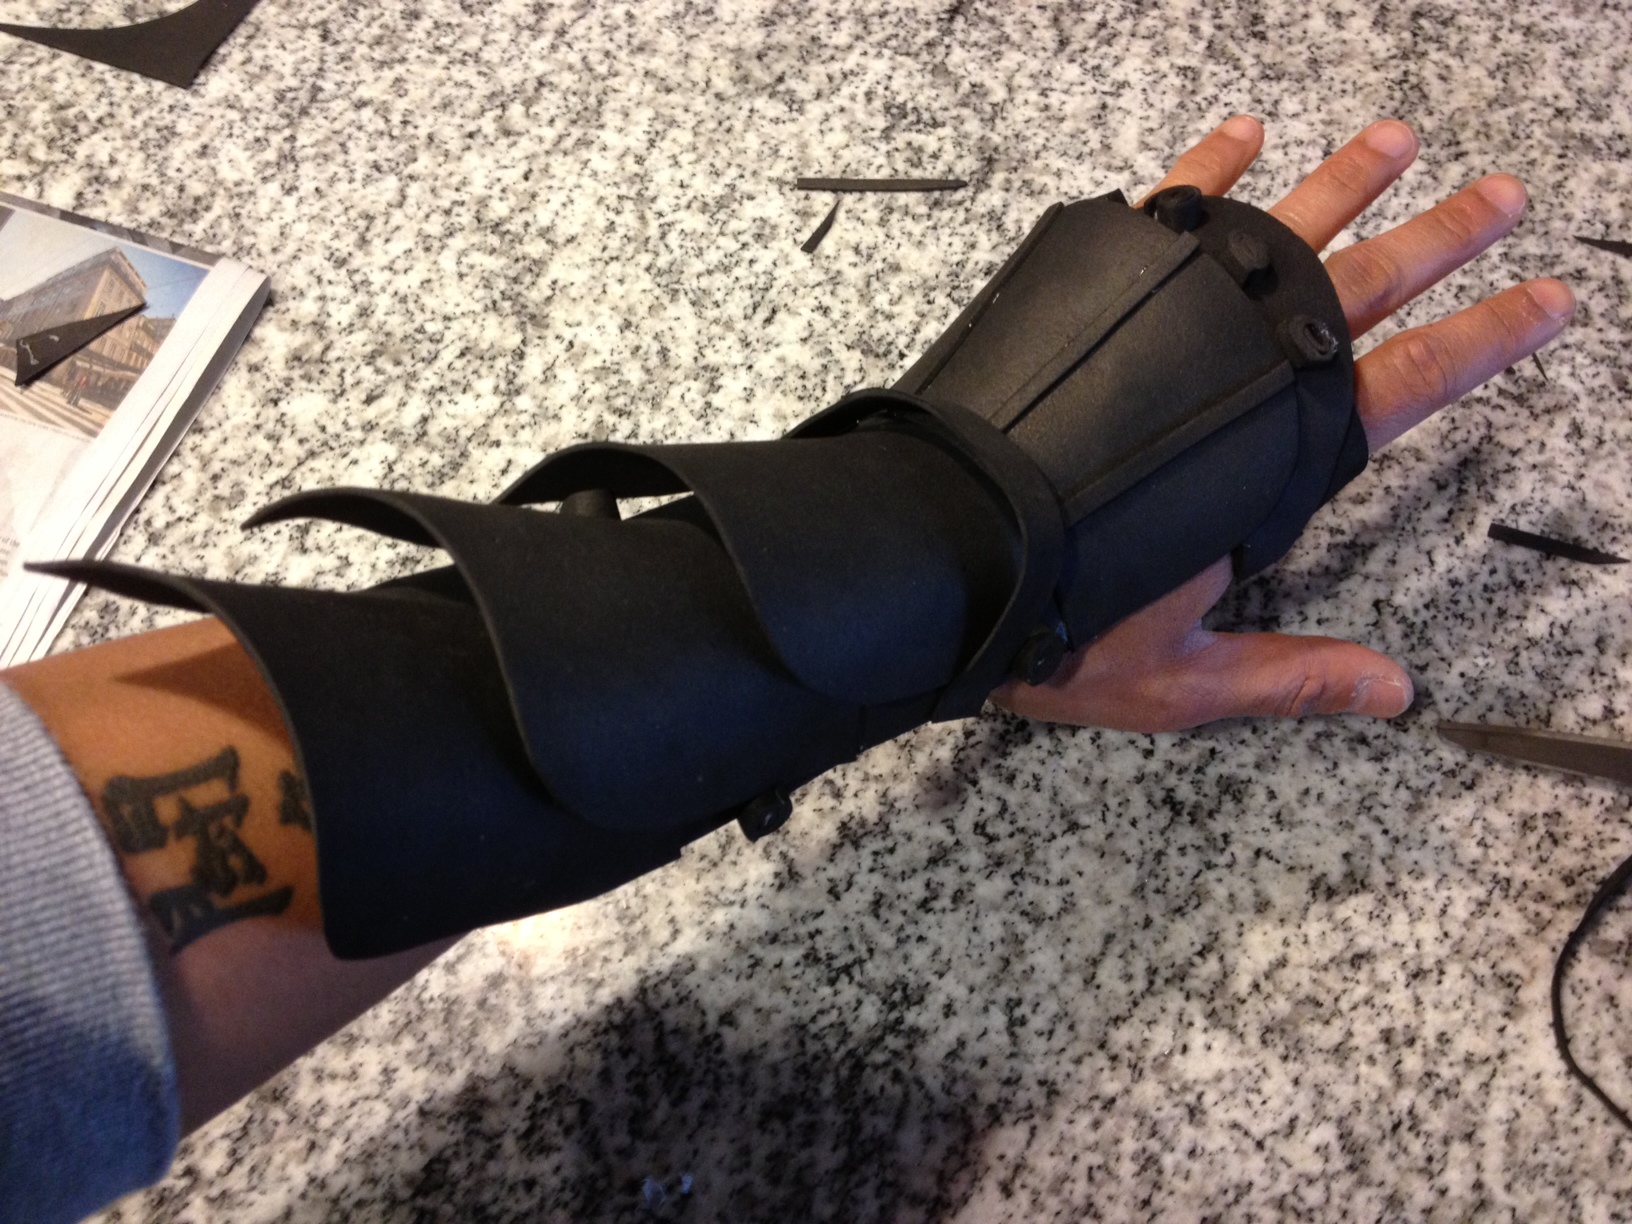
photo 4

Finished glove

photo 5

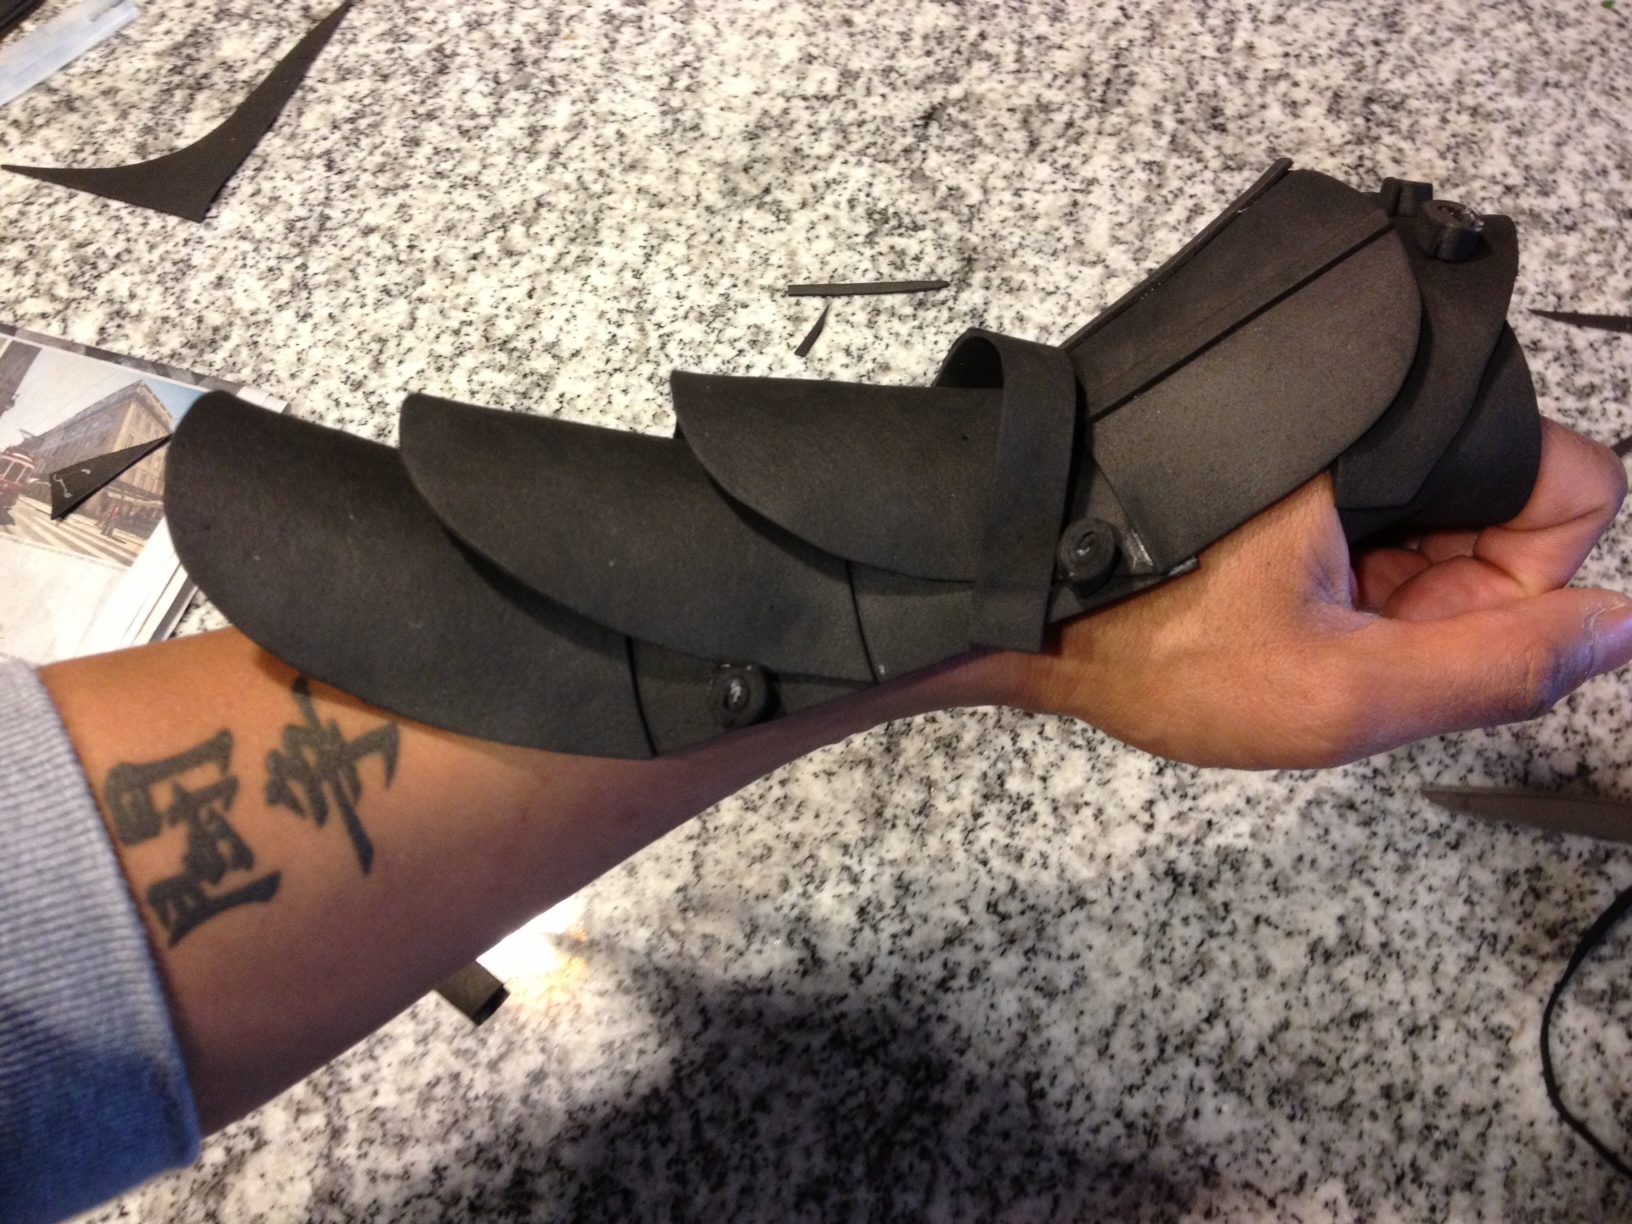
Close-up of the stud attachments

Keep in mind that craft foam is very thin, so this armor is purely for show! And again, you can make almost anything you can imagine with these materials. For more ideas,  search “cosplay diy” and also check out this amazing tutorial.

And don’t forget to come to the DMA to see Takenouchi no Sukune Meets the Dragon King of the Sea and to participate in Studio Creations!

JC Bigornia
C3 Program Coordinator

The Spot for Art

Over the last few years, DMA visitors may have come to know the drop-in art making area in the Center for Creative Connections as the Space Bar, a name that corresponded with our Encountering Space exhibition. If you’ve come into C3 lately, you probably noticed that we like to make strong connections and keep things fresh. When it was known as the Space Bar, this area offered materials loosely based on works of art in the C3 Gallery. Every month we changed the materials to focus on a new theme related to the concept of space.

2001_358_A_F

Martin Delabano, Family Portrait 1963, 2001, Dallas Museum of Art, gift of Mr. and Mrs. Bryant M. Hanley, Jr., Lorine and David H. Gibson, and Sonny Burt and Bob Butler

Now known as the Art Spot, this area still offers art-making for anyone, anytime, but the focus is now on a specific artwork. Since November 2012, Martin Delabano’s Family Portrait 1963 has provided inspiration for our visitors. The complexity of this piece allows us to explore various themes over an extended period of time.

In November and December, we encouraged visitors to better understand the characters within the sculpture and consider the clues the artist has given us by the items associated with each family member. Visitors could use the materials provided to create their own 3D Family Portrait.

During January and February, we focused on the sculptural aspect of this piece and the assortment of materials the artist used.  Our visitors used materials ranging from buttons to wood scraps to create Found Object Sculptures.

In March and April we took a closer look at the four-legged family member, Crackers, and asked visitors to make their own pet or an imaginary Pet Pal for the Delabano family pet.

Next month our theme changes once again. This time we are taking the perspective of the artist, who in 2001 portrayed his family and himself as they were in 1963. Martin Delabano isn’t the artist at the easel, rather he’s the young boy posing like our beloved “Big Tex” from the State Fair of Texas. Come by C3 in May and June to see Family Portrait 1963 and make a Past or Future Self-Portrait of your own.

Jessica Fuentes
C3 Gallery Coordinator

Artful Eggs

The Easter holiday is almost upon us, and I for one am so excited to decorate Easter eggs! I am proof of the fact that this festive activity is for children and adults alike. Moreover, if approached in the right manner, decorating Easter eggs can be downright artistic. Beautiful eggs don’t require expensive materials or a BFA–in fact, all it takes to create some slamming shell designs is inspiration, imagination, and a few items found around the house!

Step 1: Boiling the eggs. Boiled eggs stand up better to the treatment required to decorate eggs (dyeing, drawing, wrapping). Place eggs in a medium sized pot and add enough water to reach about an inch above the eggs. Bring water to a roaring boil, remove from heat, then cover eggs for 15 minutes. Drain water, and allow eggs to cool. (This step can be accelerated a bit by placing eggs in a bowl of water in the refrigerator).

Drying rack made with flathead pins and foamcore.

Drying rack made with flathead pins and foamcore.

Step 2: Preparing the materials. As I said, artful eggs require simple materials: newspaper, food coloring, spoons, tongs, glass cups or mugs, white vinegar, a small paintbrush, tempera paint, hot water, Styrofoam board, and flathead pins. Placing flathead pins in a grid pattern on foam board creates a great drying rack for dyed eggs.

To mix colors, place 2 tablespoons of vinegar and 2/3 cup hot water in your cup along with 3 drops of food coloring. Add more drops to darken the dye. This is a great (albeit stinky) way to review color mixing with kids–experiment and see what fun colors you can come up with!

Step 3: Finding inspiration. Inspiration can come from a variety of sources, but for this year’s batch I’d recommend using the DMA’s permanent collection as a muse. The Museum’s encyclopedic collection provides a wealth of ideas, and, who knows, you might gain some artistic insight during the art-making process! When choosing works of art I looked for bright colors, simple shapes and bold lines, as these would lend themselves well to my oblong canvases. Here are the four works I decided upon:

Step 4: Decorate! Before diving into your artistry, wipe each egg down with some vinegar (this will prepare the shell for the dyeing process).  It was interesting to use works of art that employed different decorative techniques.

  • The Matisse egg was first dipped into an orange dye for two minutes (increasing the amount of time in the dye will lead to a darker color).  After the egg dried, a small brush with tempera paint was used to add blue and green leaves and red berries.

splat

  • To create the neutral background of the Pollock, the egg was dipped into orange and then blue dye (about 10 seconds each). I was then able to perform my own version of action painting!  With my paintbrush I flicked, splattered and flung watered-down black, white and grey tempera paint onto the egg. (Action painting can get messy, so newspaper comes in handy!)
  • Rothko’s contemplative color duo was completed by dipping the bottom of the egg in the orange dye (for about 30 seconds) and the top in red (30 more seconds). The egg should be left to dry between each dip. The middle portion of the egg was not taped, since I think the frayed edge caused by the dye enhanced the Rothko-style.
  • Completing the Mondrian egg took a little tempera paint and patience! Who knew that painting a grid pattern onto a rounded surface isn’t the easiest thing to do. With the straightest lines I could muster, I painted Mondrian’s primary color scheme onto the clean, un-dyed surface of the egg. It took a few layers of paint (left to dry in-between) to achieve more opaque colors.

Step 5: Display and Enjoy! 

Artful eggs. L-R: Henri Matisse, Ivy Flower; Jackson Pollock, Cathedral; Mark Rothko, Untitled; Piet Mondrian, Composition with Large Blue Plane, Red, Black, Yellow, and Gray

Artful eggs. L-R: Henri Matisse, Jackson Pollock, Mark Rothko, Piet Mondrian

These artful eggs are too good to keep to yourself!  Share your masterpieces with us through Facebook, Twitter, Flickr or even post them here on DMA Canvas–we’d love to see your DMA inspired works of egg-art! Now that you’ve completed your artwork the real question emerges: which will taste better, a Matisse or Pollock deviled egg?

Artworks Shown:

  • Henri Matisse, Ivy in Flower, 1953, Dallas Museum of Art, Foundation for the Arts Collection, gift of the Albert and Mary Lasker Foundation
  • Jackson Pollock, Cathedral, 1947, Dallas Museum of Art, gift of Mr. and Mrs. Bernard J. Reis
  • Mark Rothko, Untitled, 1952,  Dallas Museum of Art, gift of the Meadows Foundation, Incorporated
  • Piet Mondrian, Composition with Large Blue Plane, Red, Black, Yellow, and Gray, 1921, Dallas Museum of Art, Foundation for the Arts Collection, gift of Mrs. James H. Clark

Danielle Schulz
Teaching Specialist

Special thanks to Alex Vargo for her eggcellent work.

A Click of the Heel

Late Night Creativity Challenges are something I look forward to each month. The energy, originality, and competition unleashed in the galleries of the Museum is so inspiring. The visitors who participate in these activities are able to look at the artwork in our collection in a whole new way.

Here are some of the thoughts of our challengers and participants:

“The creativity challenge helped me step out of my ‘corporate head’ and connect with the artwork in such a way that I was able to make a connection with the pieces and see them with new eyes.   The artwork my team was assigned to work with was not something I would normally have gravitated to in a visit to the museum, yet by the end of the challenge, I was quite fond of the work!”

“I really enjoy the challenges, they make me appreciate the art and it’s fun to go by paintings I’ve written songs about or made Facebook pages for because of the challenge. It makes me really look into the piece and walk away with a better understanding and more of a connection rather than reading a brief synopsis and walking away. Not only have I been able to go in depth with a few pieces but have been able to remember other pieces fellow participants have made things about. Interacting with art was something I thought I could never do. Appreciating art was something I also considered out of my reach. Creativity Challenges have proven me wrong in both of those regards and created a whole new experience for visiting the DMA”

sabuda

Me with our special guest Robert Sabuda

The latest challenge was inspired by the paper mechanics of the great author, illustrator, and pop-up creator Robert Sabuda. Having been inspired by Sabuda and a longtime fan of his work, I was thrilled to create a program inspired by him. And did I mention that he was also our guest judge for the creations?

The theme for our March Late Night and the fuel for my Sabuda Creativity Challenge was the wonderful Wizard of Oz. The teams were challenged to create their own shoes inspired by Dorothy’s ruby slippers, which of course gave Dorothy the power to go home. Each team had to create their own magically-powered shoes with the limited materials of paper and tape. After they created their shoes, the teams modeled their creations and explained what magical powers their shoes possessed, all while walking down a handmade yellow brick road leading them into the gates of The Emerald City–well, the gates to the DMA’s The Wendy and Emery Reves Collection to be more exact.

“The most rewarding experiences (and the projects that are most successful) have occurred when people work together. The winner of the latest creativity challenge is a good example. The family that won made red shoes with fringed red construction paper, and each person in the family had a specific job. Their project was successful, I think, because they developed prototypes together and found usefulness for everyone. From my perspective, the most creative teams are typically the larger teams. While the art hanging on the walls is certainly inspiring, the collaborations and conversations between team members seem to be the best idea-catalyst.” – C3 Volunteer

Here are a few examples from the challenge:

shoe

shoe2

These shoes were unique for many reasons, but what struck our guest judge and I the most was the power the shoes had to take the person who was wearing them into any situation. They could be courageous when wearing the shoes and defeat any obstacle that came across their path. They also named the shoes after our guest judge, which is always a nice touch!

Come join in the fun next Late Night on April 19!

Amanda Batson
C3 Program Coordinator

Make This: Poured Paint Sculptures

20130217_151126

Studio Creations participants share their thoughts about Lynda Benglis’ work.

During Studio Creations this month, we looked at Lynda Benglis’ Odalisque (Hey, Hey Frankenthaler), part of the special exhibition Difference?. There are many aspects of this work of art that make it fun to talk about with people, but what I find the most interesting is the way it challenges how we define painting and sculpture. To me, it really lives between the two! This idea provided the catalyst for our Studio Creations art making activity. During each workshop, visitors created poured paintings based on chance, which, when dry, could be peeled from the painting surface and made into something sculptural. Here’s a quick tutorial for creating the project at home with your family:

Supplies

  • Gloss medium or Liquitex pouring medium (available at most art supply stores)
  • Acrylic paint (I prefer gloss acrylics, but any type will work well)
  • Painting surface: A sheet of cardboard covered with heavy plastic (or something similar)
  • Squeeze bottles or cups for dispensing paint
  • Toothpicks for adding designs (optional)

IMG_0449[1]

Plastic-covered painting surface, gloss medium, and acrylic paint in squeeze bottles

Steps

IMG_0450[1]

Squeeze a small amount of gloss medium onto the painting surface. Using your squeeze bottles or cups, drop a little bit of paint into the medium. There’s no right or wrong way to do this so feel free to experiment! Try planning it out or putting the paint in randomly.

IMG_0451[1]

Now try tilting your painting surface in different directions. The paint will start to run depending on the direction and angle that you tilt it. This is where the part about chance comes in–you only have a certain amount of control over the paint as it moves. Chance played a big role in the way that Lynda Benglis created Odalisque–she didn’t have any control over the paint after pouring it.

IMG_0453[1]

Whenever you feel like it, add more paint. But be sure to drop it into the medium–otherwise, it could break off from the rest of the painting when dry. Continue adding paint and tilting the surface until your painting almost reaches the edge.

IMG_0455[1]

When you are finished, let your painting dry for at least one day. If you added a lot of paint, it may need an extra day or two to fully dry. Afterwards, carefully peel the painting away from the painting surface–it should be plastic-like in consistency.

Now try making it into something sculptural! Your painting can easily be cut and molded. Some ideas that came up during Studio Creations were: a mask, a bowl, a mouse pad, a jacket, and a sun catcher, among others. If you’d like to share your creation with us, feel free to send an image to jbigornia@dma.org and I’ll post it on our Flickr page.

IMG_0458[1]

Finished painting

IMG_0459[1]

Almost sculptural, don’t you think?

IMG_0460[1]

Detail of paint surface

Tips

  • Your painting does not have to look a certain way. Have fun and experiment!
  • For best results, I suggest using pouring medium instead of gloss medium. It’s a little bit more expensive, and it’s only made by Liquitex, but it was designed for projects just like this one and can prevent “crazing” in the paint. For super-duper results, mix a little bit of gloss or pouring medium into your paint before you start your project. One part medium to ten parts paint should be perfect. You can also try string medium!
  • You can get different designs by letting the paint run in one direction for a while and then turning it in another direction. This is really good for making swirls, circles, etc. You can use a toothpick to create fine lines as well.
  • The medium dries clear.
  • Lots of other cool poured paint projects can be found online!
  • Further questions? Feel free to shoot me an email!

JC Bigornia
C3 Program Coordinator

C3 The Place To Be!

The Center for Creative Connections is a hands-on, interactive, experimental learning environment for people of all ages at the Dallas Museum of Art. I am honored to be part of some amazing programs for adult visitors that offer a variety of learning experiences for beginners and experts!

Thursday Night Programs

Twice a month during DMA’s Thursday Night Live, C3 offers two-hour adult workshops from 6:30-8:30 p.m. in our classrooms. During one of these Thursday evenings we bring in creativity expert Magdalena Grohman, Ph.D. from The University of Texas at Dallas, and a local art educator to lead Think Creatively. The Think Creatively program provides adults the opportunity to put creative thinking to practice and discover the power to transform the imagination. Each workshop has a different theme and focus on one of the following: associations, inquisitiveness, or transformation. To sign up for upcoming C3 Adult workshops click here.

Participants discussing their work.

Participants discussing their work.

The other Thursday program offered is our C3 Artistic Encounters workshop where we invite local artists from the community in to lead art making workshops related to the DMA’s collection. In addition to that, this year we also featured an evening called C3 Digital Show and Tell where our visitors submitted their personal artwork and work they created during the C3 classes to show to everyone on the big screen!

C3AE with guest artist Juergen Strunk

C3AE with guest artist Juergen Strunk


Late Night Programs

Late Night at the DMA is an incredible evening for the entire family. There is always something happening in our various theaters, stages, classrooms and galleries. One of our Late Night programs is the Creativity Challenge. Ten teams compete against time and others with limited materials in order to make unique creations inspired by works of art from our collection. These challenges are always fun, risk-free, hands-on and meant to encourage divergent thinking.

Creating love songs to works of art and musical instruments. This team is creating a one woman band!

Creating love songs to works of art and musical instruments. This team is creating a one woman band!

Miss DMA Creativity Challenge

Miss DMA Creativity Challenge

Our next Creativity Challenge will be during Late Night on March 15th. Bring your team and sign up with me at 9:30 p.m. in C3!

Be sure to come by and check out the exciting programming happening in C3!

Amanda Batson
C3 Program Coordinator

Show Me the Love!

It’s Valentine’s Day, and love is in the air here at the Museum! The works of art might not have their own shoebox mailboxes like the one I made in third grade, but I like to imagine the homemade Valentines they might pass between each other. We have our “going steady” couples, our “head over heels” couples, and even a few secret admirers. If you haven’t made your own Valentines yet, don’t fret—there’s still time. Take a note from the art couples below, use the DIY tutorials featured, and you’ll be showing the love to your one and only in no time.

These two are joined at the hip! Painted by John Singleton Copley in 1747, Woodbury and Sarah Langdon were real-life sweethearts who commissioned the artist to paint their portraits shortly after their marriage. Woodbury was a wealthy New Hampshire merchant with dreams of politics, and Sarah was his young bride. The couple eventually had ten children, and Woodbury went on to hold political office and serve on the New Hampshire Superior Court. Since these two are never far apart, I can imagine Woodbury sending this Valentine to his sweetheart:

matchbox-love-note tutorial valentine's day party ideas party printables valentine's day crafts

Download a template and find instructions for this project at the Bird’s Party blog.

Edward Hicks, The Peaceable Kingdom, c. 1846-1847, Dallas Museum of Art, The Art Museum League Fund

Edward Hicks, The Peaceable Kingdom, c. 1846-1847, Dallas Museum of Art, The Art Museum League Fund

These animals have been peacefully sharing their close quarters for years! Painter Edward Hicks returned to this subject again and again, imagining a world where the lambs and lions, leopards and kids could all exist together in peace. Heavily influenced by his Quaker roots, Hicks painted this subject more than one hundred times. After spending all that time together, I imagine these animals consider one another family. Perhaps the bear could send this Valentine to the lamb?

toobvalentine5

Free printables and an animal group cheat sheet can be found at the Modern Parents, Messy Kids blog. Who knew that a group of giraffes is called a tower?

This trio is often seen hanging out in the galleries together like best buddies. There’s the boisterous, rowdy friend and the beautiful, calm sidekicks. Vernet’s A Mountain Landscape with an Approaching Storm (top left) highlights the wild beauty and sheer power of nature, while Anne Vallayer-Coster’s floral still life paintings (bottom left and right) capture the calm, quiet loveliness of a well-placed petal. Can’t you imagine the still life paintings slipping this Valentine into Approaching Storm’s pocket (perhaps with some giggles)? With its gusting winds and swelling clouds, how could Storm resist the bubbles?

You-BLOW-Me-Away-Valentine-Just-add-bubbles-Cute-idea-and-free-prints-on-lilluna_com-valentines1

Find bubbles at the dollar store and use this free printable from the Lil Luna blog to make your own.

Vishnu as Varaha, 10th century, Dallas Museum of Art, gift of David T. Owsley via the Alvin and Lucy Owsley Foundation and the Alconda-Owsley Foundation, E.E. Fogelson and Greer Garson Fogelson Fund, General Acquisitions Fund, Wendover Fund, and gift of Alta Brenner in memory of her daughter Andrea Bernice Brenner-McMullen

Vishnu as Varaha, 10th century, Dallas Museum of Art, gift of David T. Owsley via the Alvin and Lucy Owsley Foundation and the Alconda-Owsley Foundation, E.E. Fogelson and Greer Garson Fogelson Fund, General Acquisitions Fund, Wendover Fund, and gift of Alta Brenner in memory of her daughter Andrea Bernice Brenner-McMullen

This pair is one of those “you’re my hero” kind of relationships. The 10th century statue from India depicts the Hindu god Varaha in his boar-headed avatar Vishnu. When the earth goddess Prithvi is imprisoned under the sea by an evil demon, Vishnu saves the day, rescuing her from the depths. Look closely and you can see Prithvi perched on Vishnu’s shoulder. No doubt, she would send him this Valentine:

Superhero Valentine 9

Use the free printable at the Zakka Life blog for the superhero in your life.

I hope you are feeling inspired by our artsy couples. Come pay them a visit and decide for yourself if the Valentine fits. As for your own Valentine’s bliss, if all else fails, bring your true love to the DMA and let them know this:

il_fullxfull_205946444

(Print available for purchase at Love Sugar’s etsy shop)

Leah Hanson
Manager of Early Learning Programs

Teen Learning Lab

dma_logo[2]Perot-Logo


The DMA, in partnership with the Perot Museum of Nature and Science, is a proud recipient of a 2013 IMLS Learning Labs in Libraries and Museums Grant! This grant is for the planning and design of a joint, media-based Learning Lab for middle and high school students to collaborate, create, and connect with peers, experts, and mentors in an environment that is comfortable, social, and cutting edge. One of only twelve projects to receive funding this year, ours will examine the question, “Where do art and science intersect?”

The most exciting part is that the entire project–from its design to its programs–will largely be teen-generated. In addition to getting feedback from local teens, a teen council will be formed that will work directly with Museum staff to shape a more specific vision and plan for the Lab. It will be especially interesting to hear the specific aspects of art and science teens want to explore.

The Learning Lab will be informed by research on teen participation in new media such as the concept of HOMAGO (Hanging Out, Messing Around, Geeking Out). So not only will teens be able to participate in programs centered around issues that interest them, they will also be able to experiment, tinker, and learn on their own using state of the art media tools in the areas of audio, film/video, drawing, photography, communication/writing, and design.

Urban Armor 1

All of this represents an exciting shift in the way we think about our audiences and it’s our hope that the Lab truly gives teens a sense of ownership in the DMA and the Perot. Having them generate their own content instead of participating in what we think they want is a concept that’s at once scary and exhilarating; but above all, it’s one that’s long overdue.

The Learning Lab Team is just beginning the planning phase of the project, so we will post updates as our ideas grow and develop. In the meantime, check out the Chicago Public Library’s YOUmedia, an amazing Learning Lab example. And tell us what you think–where do art and science connect? What types of programs involving the two would you want to see?

JC
C3 Program Coordinator

Tiny Thumbs at the Dallas Museum of Art

According to the Tiny Thumbs Facebook page, “Tiny Thumbs is a new organization looking to build up awareness for the indie game scene and showcase some of the best talent out there through pop-up arcades/art shows.”  In anticipation of their upcoming pop-up arcade at the DMA’s Late Night tomorrow night, I virtually sat down with Robert Frye, UT Dallas Ph.D. candidate and co-founder/co-curator of Tiny Thumbs.  As is probably most fitting, our interview took place over a series of emails:

image from "Tiny Thumbs: Breaking Out"photo credit: EbonSoul Photos

image from “Tiny Thumbs: Breaking Out”
photo credit: EbonSoul Photos

I found this great description of Tiny Thumbs on your Facebook account and I think that sums up “what” Tiny Thumbs is really nicely, but my next thought is, how did Tiny Thumbs come to fruition?

The idea of Tiny Thumbs came about as[co-founder] Kyle [Kondas] was teaching a class I was involved in called “Games and Gallery Art” where we really sought to tackle the idea of how to show games in an artistic space and what is gained from doing so. We were both inspired by the work of similar shows like Baby Castles – and the idea that we really had a desire to get people off of their computers for a bit and really connect with people, and not just gamers, but we really felt like independent designers could learn so much from talking with people outside of their current circles.

In your Tiny Thumbs description, it specifically mentions the “indie game scene.” Why are indie games important?

I’ve always seen indie games as the ‘art house’ of videogames, it’s the place where people can push the boundaries of interesting design and art and help to get to the core of what makes a game a game. Of course, not all indie games have such a lofty goal, but they still give the reigns of creation to a greater variety of people and that can only lend a larger amount of voices to the field. I think it’s the ability for ANYONE to make a game, for interesting ideas and experience to show up and change how I feel and view games on a weekly basis that makes me love indie games so much. It’s people, making games because there is a spirit inside them that drives them to do it. People who HAVE to create games, made for a community that is passionate to play them.

1

image from “Tiny Thumbs: Breaking Out”
photo credit: EbonSoul Photos

Other than being under the “indie game” umbrella, is there anything else that connects the content that you choose for your shows?

Not really! For our first few shows we wanted to take games of exceptional quality and bring them out of the “one person, one computer” context that they were sitting in. Our goal was to help spread the word in Dallas that there was a place for games of quality to be shown. Now in the future we would love to do themed shows, but for now we are picking games of interest and quality to start a dialogue and really find out what Dallas needs from our show.

Recently there have been a surge of articles asking whether video games are art. MoMA has added video games to their permanent collection, and the Smithsonian has created an exhibition about the evolution of video games as an art form, which is scheduled for a two and a half year tour around the United States. Assuming that you are on the “yes” side of the debate, can you tell me more about why you feel this way?

Are games art? Haha, this is a deceptively difficult question, as you really have to nail down why the question is being asked, what kind of information is trying to be achieved – do I think that games have the potential to have strong artistic statement? Yes. Do I think that games can have aesthetic properties that can inspire and enthrall? Very much so. Often when the question is asked, it seems to me that the real question that is trying to be asked is “can we take games seriously” and for that question I would say emphatically yes. We’ve only just begun to understand how interaction can change the stories and experience that we craft, and what games really mean to people. Video games have only been around for about 50 years (give or take) but in that time we have gone for dots moving along a screen to games like Journey which have breath taking vistas. So are games art? Perhaps, but more importantly – games NEED artists and art viewers to help them become the fullest experiences they can be.

4

image from “Tiny Thumbs: Breaking Out”
photo credit: EbonSoul Photos

Looking forward, what’s next for Tiny Thumbs?

So many things! We are currently in talks for at least two more future shows this year and are excited to have many more events in the future. If everything goes right, we would love to have a monthly show – traveling around venues in Dallas, sampling the flavors of this city and hopefully making the show something that the city can be proud of!

Stop by tomorrow night for Late Night at the DMA.  Kyle Kondas and Robert Frye’s Tiny Thumbs video arcade will be available for you to play and observe from 8pm – 11pm in the Center for Creative Connections’ Tech Lab.

Jessica Fuentes
C3 Gallery Coordinator

Theater, Play, and Creativity

Thursday evening the Center for Creative Connections was filled with thirty playful, divergent thinkers who were asked to have fun and break rules. These adults were attending a once a month program called Think Creatively taught by Dr. Magdalena Grohman and guest performer Harold Steward from the South Dallas Cultural Center.  During one portion of the evening, visitors engaged in playful theatrical activities that were developed from Steward’s theatrical background and knowledge of the practice known as Theater of the Oppressed.

During the 1970’s, Brazilian activist and actor Augusto Boal was the driving force for the creation of this theatrical practice. The goal of Boal was to use theater as a way to promote social change. Boal took inspiration from educator and theorist Paulo Freire, who is well known for his work Pedagogy of the Oppressed. In this revolutionary text, Freire argues that education should allow those who are oppressed to recapture their sense of humanity and overcome their sense of oppression. However, that oppressed person must play an active role in their own freedom. Inspired by the critical pedagogy of Freire, Boal believed that through the dialogue and interaction between actor and audience, people could free themselves; the actors and audience become active explorers and transformers of their own realities with the help of a facilitator. Theater of the Oppressed is about dialogue, playing and learning with one another to create change.

Image

As I watched Steward act as the facilitator, I was encouraged by the freedom that the participants seemed to gain with each passing moment. He had the visitors stand back to back; he then called out directions for each of them to follow. Placing one’s head to another’s hip, or positioning a knee to an elbow was really a sight to see.

After this warm-up, Steward and I demonstrated an activity together. I was directed to make a movement and was not allowed to stop moving until Harold said, “What are you doing, Amanda?” I was not allowed to respond with what my action was, but instead I had to say what I wanted him to act out. I called out the action, “Running a marathon,” and he pretended he was running the race of a lifetime. After, the visitors were roaring in laughter and running around the room, engaging in this activity. Steward had them stop and then broke all the rules that he just taught them. The pairs had to create their own guidelines and interpretations to the last activity. One pair decided that they were only allowed to sing to each other, another group determined that all of their activities to act out had to be represented in mime.

The visitors responded to the process and indicated that participating in these Theater of the Oppressed exercises was difficult for them at first because they had to overcome their initial hesitations to move, play, and be free without fear—but once they let go of all that was holding them back (or oppressing them), they were able to experience liberation and freedom from restraint.

Image

Here is another Theater of the Oppressed activity created by Augusto Boal that you can try with your friends!

The Name and Gesture Game:
The group will stand in a circle. The facilitator introduces themselves and creates a physical gesture. The whole group repeats the name and gesture. The process occurs until everyone has said their own name and preformed a gesture. Then, this process is repeated but without the name. Anyone who wishes takes a step forward and the rest of the group must say the name and preform the gesture.

I hope you’ll join us in C3 soon!

Amanda Batson
C3 Program Coordinator


Archives

Categories